From Pixels to Information: A Comprehensive Guide on QR Codes
On what QR codes are, why do we use them, and how do we encode/decode information through them
You’ve probably scanned a QR code before. They’re everywhere. But have you wondered how they work? Because this has been on my mind a lot recently. So I did some investigation and here is a summary of the key findings, notable points and fun facts.
How and why QR codes came into being
Masahiro Hara, a Japanese engineer who worked at Denso Wave then, invented the QR Code (or Quick Response codes) in 1994 to meet the need for a more efficient and versatile method of tracking automotive parts during manufacturing. Hara and his team developed QR codes as an improvement over traditional barcodes.
QR Codes vs Barcodes
Traditional barcodes could only store a limited amount of information horizontally, while QR codes can store much more data both horizontally and vertically. A barcode can store 1,556 bytes, whereas a QR Code can store up to 7,089 numeric characters, 4,296 alphanumeric characters, 2,953 bytes, and 1,817 kanji characters.
Components
And now let’s get into the fun part, what do all those black and white squares represent? QR Codes consist of black and white elements called modules, where black represents 1 and white 0. These modules can be combined into meaningful binary messages.
Before diving into how we encode/decode the information, let’s first analyse what the main components of the QR code are:
Function Patterns
Quiet Zone - helps the scanner to distinguish between the QR code and its surroundings, making it easier to detect the QR Code.
Position Pattern - located in 3 of the QR code’s corners, it allows the scanner to quickly recognise the code orientation. This means the code can be scanned at any angle.
Separator - used to keep space between the position pattern and the other information, helping the scanner to identify the position pattern.
Alignment Pattern - used for correcting distortion by straightening the code on a curved surface. On higher versions, QR codes tend to have more alignment patterns. Ver40 which is the largest QR code consists of 46 alignment patterns. Ver1 doesn’t require any alignment patterns.
Timing Pattern - helps the scanner to determine the width of a single module.
Encoding Region
Version Information - there are 40 versions of QR codes, from 1 up to 40; this region specifies which version is being used.
Format Information - contains information such as error correction level, mask pattern etc.
Data and error correction keys - the remaining available code is used for storing the data along with the error correction data. The correction data is done by the Reed-Solomon codes which allows the QR code to still be scanned if some information is corrupted/not visible etc.
Putting everything together:
How does versioning work?
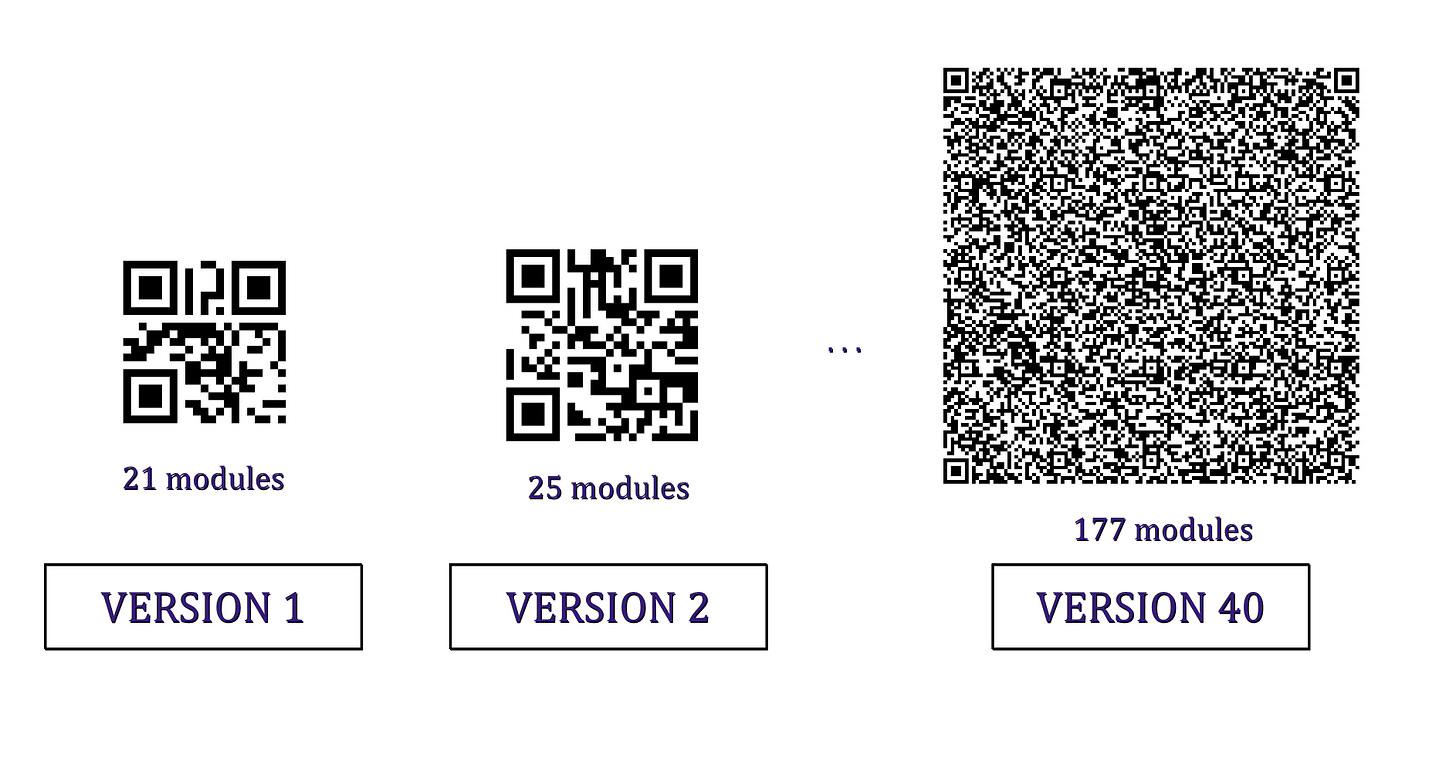
There are 40 versions of the conventional QR code. Each version has a different number of data modules, commencing with Version 1 (21 × 21 modules) up to Version 40 (177 × 177 modules).
With a new higher version, another 4 additional modules per side are added.
How would we know which version we need to use?
QRCode.com provides a comprehensive list of versions given the type of input data you want to use (numeric, alphanumeric, binary, kanji) and the correction level.
Let’s say I want to create a QR Code for the text “The Crafty Dev“ which means we’re only interested in a 14 letter alphanumeric input. And let’s suppose we’re going to stick the QR code in various places outside, so we need a pretty high error correction capability (in case it rains or it gets stained etc). We need to find a figure in the QRCode versioning table, that is 14 or over and with an H correction level, so a good version for us to use would be version 2.
The Error Correction Level
The QR code error correction is based on the Reed-Solomon algorithm which works in a similar way to the parity error correction - it adds extra bits to the data so that errors can be corrected.
Fun Fact
The Voyager spacecraft uses the Reed-Solomon error correction to ensure that data transmitted from the outer reaches of the solar system can be reconstructed even if it encounters interference, which is highly probable. Given that signals from Voyager 1 can take up to 20 hours to reach Earth, employing an ARQ (Automatic Repeat reQuest) mechanism to request retransmission in case of errors would be highly impractical. (source)
The way Reed-Solomon does encoding deserves a completely different article so I’ll link it here once it’s published, so stay tuned.
Unmasking
Now comes the crazy part. Let’s say we have a QR code and we want to manually decode it. Where do we start? The first thing we’ll need to look at is the Format Information section.
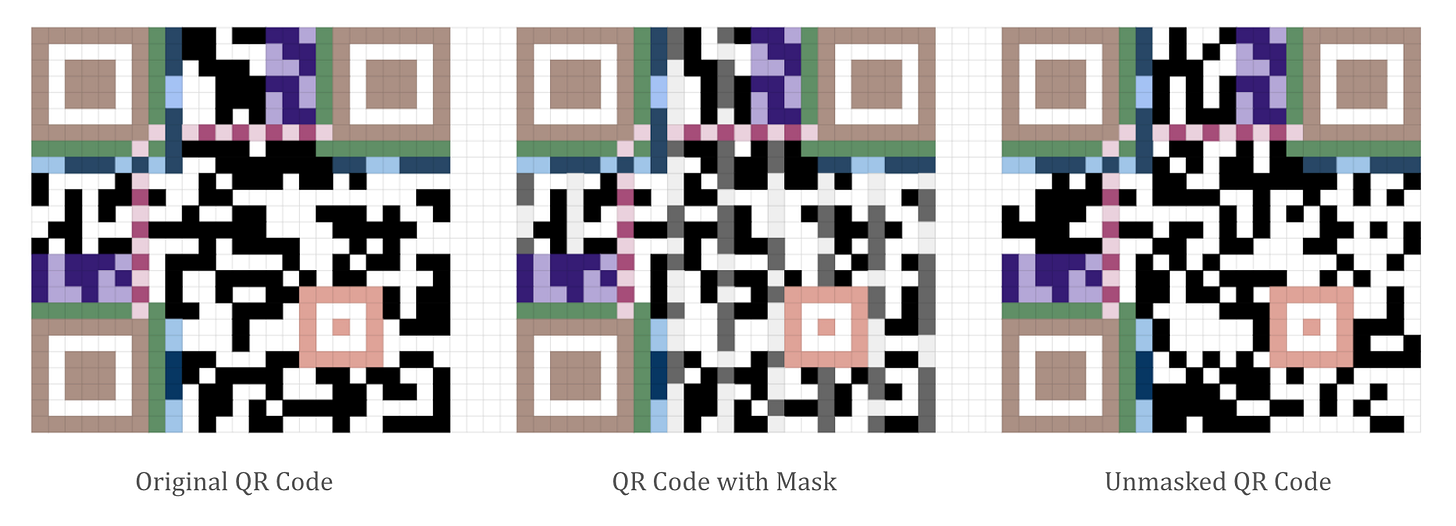
The first 2 modules (colored red in the picture above) will give you the error correction level. And the next 3 (colored green) will give you the mask pattern.
This means we have a 00 error correction level, which means high, 30% of data bytes can be restored; and a 111 masking pattern.
The QR codes are usually masked, so we’ll have to take off the mask first. We put the coordinates of the current bit into the formula, and if the result is 0, we use the opposite bit of that. After removing the mask on the original QR code, we’ll get the following unmasked QR code:
Decoding
Now, finally getting into the decoding part. The way a QR code is read is from bottom right to top left following the path shown below. The first 4 bits give us the encoding and the next 8 the length of the message.
This means, for our QR code, we would have a 0100 encoding, which is a byte encoding and a 00001110 message length which is 14. Byte encoding tells us we’re expecting blocks of 8 bits and that we're expecting 14 of them.
We’re going to continue splitting our QR code into blocks of 8 bits and following the pattern of interleaved blocks below, we should have something similar to the right picture below:
We can see we have indeed 14 blocks. The last block containing the 4 bits of white modules is the End of message (Terminator) representing the end of our message. Now that we have our blocks splitted we can start decoding each character. We do this by summing up all the turned on (black) bits and converting the decimal number obtained into its specific character using an ASCII Table.
This will give us the following:
64+16+4 = 84 representing T
64+32+8 = 104 representing h
64+32+4+1 = 101 representing e
32 representing " "
64+2+1 = 67 representing C
64+32+14+4 = 114 representing r
64+32+1 = 97 representing a
64+32+4+2 = 102 representing f
64+32+16+4 = 116 representing t
64+32+16+8+1 = 121 representing y
32 representing " "
64+4 = 68 representing D
64+32+4+1 = 101 representing e
64+32+16+4+2 = representing v
We finally decoded our QR code which says “The Crafty Dev“ 🙌 🙌 🙌 .
The rest of the QR code message is part of the error correction data which we’ll have a look at in the next article, where we’ll talk about how QR Codes do error correction while we’ll also dive into how the Reed-Solomon algorithm works.
Conclusion
In this article we had a general look at QR Codes, their main components, what unmasking is and how it works, and finally how to decode the QR Code message.
Stay tuned, as in the upcoming articles we'll dive deeper into:
On Error Correction: From Hamming to Reed-Solomon
QR Code Models
See you soon 👋


